Translate

Total Pageviews

Showing posts with label Trillium Exchange. Show all posts

Thursday, 23 June 2016

Trillium Exchange 2016

I signed up for the Trillium Exchange again. It has been a couple of years since my last one. The Trillium Exchange is a bit of fun where members of the SCA Kingdom of Ealdormere are paired with another participant and then make a gift for that person. Everyone tries to match the gift to their recipient's persona, likes, or possibly even just based on their favorite colours.

My recipient this year plays a 14th Century Englishwoman, the daughter of a rich wool merchant. She likes playing period games so I decided to carve her a game box, embroider a "Game of Goose" board, and carve the game pieces. I am still debating on whether I want to make her a set of dice or simply purchase modern ones.

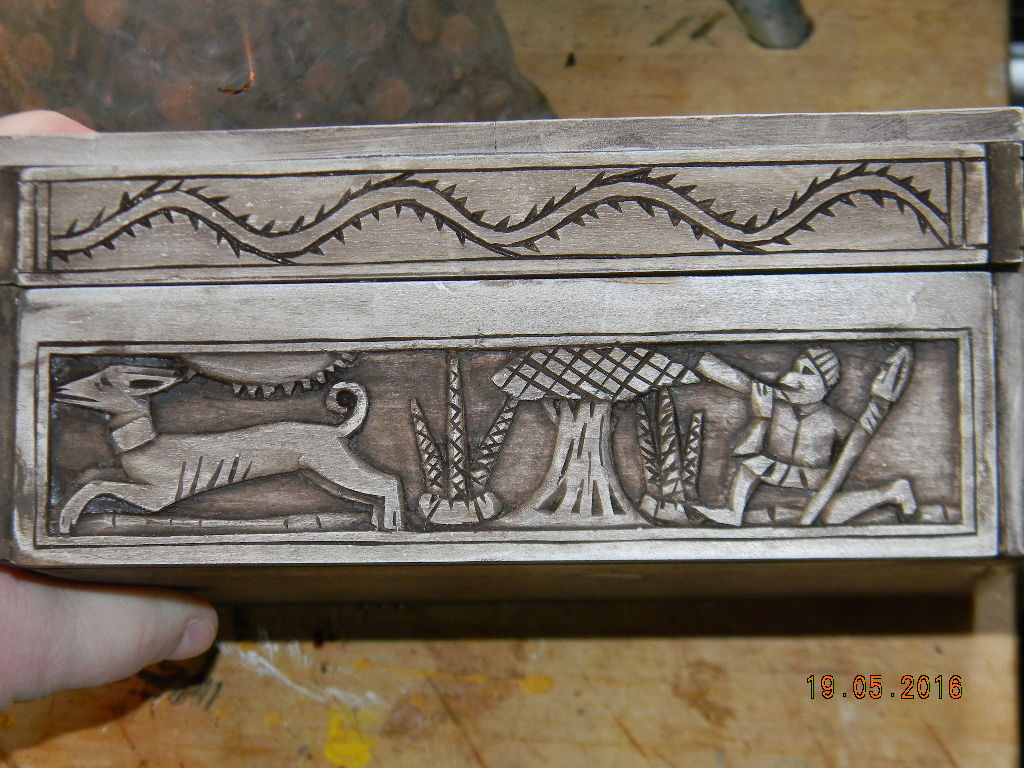
My inspiration for the game box is housed at the Metropolitan Museum of Art http://www.metmuseum.org/collection/the-collection-online/search/468458. The original is in bone but I am carving it in wood. So far I have managed to get all four panels for the bottom of the box completed and stained.

 This is an image of my carved panels. They were carved in basswood, painted white with acrylic paint, then stained with a thick walnut stain. The excess stain was wiped away. My hope was to make it look like aged bone.

These pieces will be glued onto a box made from poplar. A small box lock has been purchased and will be installed so that the box as closely as possible resembles the original, the pictures posted below.

As with last exchange, the post will not be published until after my recipient as received their gift.


Completed Project

I ended up not making any progress posts after my initial one so I am updating this post with the finished work and publishing it before I find another project to distract me.

I ended up making the box, the embroidered game board,  and six game pieces. When the amount of time it took to finish the embroidered board, I decided I did not have time to make the die so I purchased a standard set of white plastic with black pips. In the documentation I included the rules to the goose game as well as a few rules for dice games.

 The game board is approximately 15 inches square. On one page for the rules they mentioned that the original game could include a drinking tile, making it an adult drinking game, so I included a foaming mug of beer on tile 61.

Each goose is freehand drawn so no two are alike. I tried to make the pose different for each goose as well.

Other images include bridges, a house, a well, a labyrinth, a cell door, and a skull and cross bones.

The recipient's favorite colour was purple. I had a violet cotton fabric that I used to line the box bottom and lid. To line the box I glued the fabric over a single layer of cotton batting onto a piece of veneer cut to the right size. This was then glued to the inside of the box.

The game pieces were carved from scrap wood I had laying around. The three lighter pieces are basswood, cedar, and poplar. The well and tower are made from red oak, and the mug is made from a piece of butternut. The handle for the mug was carved separately then joined to the body of the mug.


Once the entire box was done I went back over and made sure all the sides were as similar to each other in colour as possible. My original plan had been to make it white with some aging added with the stain. Unfortunately, the panels absorbed the stain at different rates and strengths so in the end I made the box a fairly uniform light brown with white highlights showing through.

This was the largest project I have completed to date. The relief carving was not a new skill but also not one that I had spent a great deal of time perfecting.

The same can be said for the embroidery. Not a new skill but not one I had spent a lot of time working on over the years.

Lining the box and mounting a flush lock were new skills but the relied on my previous wood carving and fabric skills.

With everything said and done I spent a solid 4.5 months, working every day for 4-6 hrs a day to complete this project. I am quite happy with the results of the carving but I see lots of room for improvement as well. It was good to push myself and I hope to do some more relief carving and embroidery work again soon.




Saturday, 18 January 2014

Trillium Exchange #10: The finished product

And I am done. The carving is complete, the brass has been added, the hinges are on, and it has been oiled repeatedly with tung oil. Now all I have to do is let the oil cure for a week or two and it can be shipped off to it's new owner.

Besides the obvious change of using chip carving rather than bas relief, I also chose to use commercially purchased hinges. The brass plate in the front should be a small lock, if the missing piece in the front of the original is anything to judge by but I simply added a small brass plate for decoration. And finally, because of the extra space at the bottom of the images I added a line from the Anglo-Saxon Rune Poem in Old English and transliterated it into runic script.

The line I chose was the very first in the poem:
Feoh byþ frofur fira gehwylcum;
sceal ðeah manna gehwylc miclun hyt dælan
gif he wile for drihtne domes hleotan
 
Which translates to:
 
Wealth is a comfort to all men;
yet must every man bestow it freely,
if he wish to gain honour in the sight of the Lord.


As I mentioned in my last post there are several things I would like to do differently in the future:

1) I will build the box to the proportions of the photo rather than to the dimensions, or as in this case to the dimension of the wood.

2) I want to make the brass hinges myself with the repousse decoration that can be seen on the original.

3) I want to carve the figures in bas relief as in the original.

4) I would like to make a working lock that can be installed into the box.

5) I want to cut the box from a solid block of green wood and do the carving while the wood is still wet. I think it will make a difference in the ability for the wood to hold detail.

Now mind you, it is going to take lots of practice to get to the point where I can make a finished product that looks like I think the original looked when it was brand new. I have to practice my relief carving, preferably by making plaques of each side of the box. I have to research and learn how to make small period locks and of course spend some time practicing. I have to make the repousing tools and learn how to do it. And, of course I need to learn how to make hinges.

This is going to be a lifetime project. But, with luck and lots of practice I will end up with a near perfect replica of the original in pristine condition before I die.


Saturday, 4 January 2014

Trillium Exchange #9: Progress

Finally some positive progress on my exchange gift. The decoration on the lid have been completed and the decoration on the box body has been started. I have learned a few things along the way and can already see myself redoing this box at a later date.

Since the bas relief was not working out I decided to use chip carving to outline the figures. The chip carving is going much faster which is a good thing since I want to have the project finished and in the mail by Jan 30. Once oiled, as the lid is now, the figures look awesome and I am really happy with the outcome. I think Rylan will be pleased as well, even if it is not a perfect replica of the original.

When I started on the box I realized the proportions of the box are different than those of the original. I new they were a little off because I chose to go with 4 inch sides but the measurements provided on the Museum website were 6 x 3 x 3 inches, but judging by the proportions in the images the original base is 3 x 2 and the lid is 1.5 or 2 at the peak. To make my box the same proportions I am carving the images so that there is a wide border at the base. I am then going to use a line or two from the Anglo-Saxon Rune Poem to fill in the wide border after the carving is all done.

My next attempt at this box will be very different. Instead of building the box to the size wood I have or to the size listed on the website, I plan to build it as close as possible to the proportions shown in the photos. I also plan to do the next one in bas relief. Not only to make a more accurate reproduction but to practice my relief carving.

I am finding myself completely obsessed with the box. I think about it constantly. I think of ways to improve my methods of construction, my relief carvings, my proportions, and even think of ways to recreate it perfectly by starting with a solid piece of green wood, instead of building the box and lid from commercial slab wood.

While I have not thought much about the hinges or lock for this currently project I do think about them for the next generation version. I want the hinges be hand made and to have the repousse work that is barely visible on the one remaining piece of the hinges. The lock is completely missing in the extant piece so I have been trying to find out more about box locks for the Anglo-Saxon period so that I can eventually reproduce that as well.


Friday, 13 December 2013

Trilliem Exchange: #8

 I have had to start over on the box. I was finding the wood quite chippy and recommendation on the carving forums was to soak it for an hour in water. Unfortunately, the glue I used was water soluble and the pieces came apart. The next morning I found the long narrow panels had warped to the point of not being able to glue them back together again.

Of course before I could make a new lid, life got in the way and I am only now coming back to this project. I have decided that instead of deep relief I am going to use chip carving to create the images from the original onto the one I am making. After all the images are chip carved I will go back and do a very shallow relief work on the clothing just to give it some texture.


Saturday, 30 November 2013

Trillium Exchange: #7


I have made some more progress on the carving. I did end up ordering some miniature carving tools. They have helped tremendously. Now the only set back is my skill at relief carving, which it turns out I am not very good at, and my own eyesight. I wear glasses for detail work but wish I had some of the magnifying glasses you can wear over your prescription glasses. It would go a long way to helping see the work more clearly.

I have discussed this project with my mentor, who is not part of the Trillium Exchange, to see if she thinks I am on track time wise. She has full confidence in my ability to at least get the idea across if not create a perfect replica. But, she agrees that considering the time it has taken to get this much carving done (12+) hours, that I may need to shrink the scope of the project. Her suggestion was to complete the lid but leave the rest of the box uncarved.

The perfectionist in me says no way, all or nothing, the realist sees her point and the merit in her suggestion. I can spend the rest of my time making thing lid look as good as possible. Getting a really good looking lid will provide the recipient with a nice display piece, that showcases my skill, without making me stress to the point of illness over getting the whole thing done.


Trilliem Exchange: #6


I carved the first panel in the lid of my box. Turned out the tools I have are just to large to get int and make the details seen in the original. My eyes and skill may be an issue as well. I've ordered some new micro carving tools to get into all those tight spaces and can hopefully salvage the carving I have done and do better on the carvings still to come.

I do know that who ever made the original box had a high degree of skill and great eyesight. Or possibly some way to magnify the work so he or she could get in all the detail they did. I zoomed in on the front panel of the box and realized that every single person is holding something in their hands. Goblets, scrolls, and what looks like a feather quill are just a few of the things I was able to identify.

I know my skills will not allow me to recreate the box perfectly, I do hope I can at least get the feel and idea across to my recipient.

Thursday, 14 November 2013

Trillium Exchange: #5

I've been rather remiss in documenting the creation of the box, which will eventually be carved with scenes of the life of Christ. I will Also trying to make a pair of brass hinges decorated like the single piece on the extant box. I have about a month and  half left to get the box finished and into the mail. Here are some photos of the progress and completed box, along with one of my first hinge trials.


Tuesday, 29 October 2013

Trillium Exchange: #4

I tried open sand casting this pattern but I failed. I mixed two packages of molasses with the sand to make it hold the pattern and packed it firmly into a form. However, when I pressed the sculpey forms into the sand they broke. After removing the forms from the sand I realized the sand was to course any way to successfully take the amount of detail in the forms themselves. Even the really simple one did not work in the course sand.

To find and purchase the required molding compound will cause me to go over the $25 limit set my the organizers. I am also feeling like the time is slipping away from me since the project is due in February. As such I have now reverted back to another project I had in mind. A box carved with a scene of some nature. I have cut pieces of red cedar and will build a box as a base for my carving, Should that fail I have ordered some pieces of Linden (Basswood) which I know are fairly straightforward to carve.

The inspiration came from a box found at an Antiquities Dealer's shop. It is a greenwood carved box made from a solid piece of wood, with scenes from the birth of Christ on it. Since the SCA tends to discourage religious imagery I have asked the organizers to get Rylan's preference. If she wants religious, I will do religious. Otherwise I plan to carve a scene from Beowulf, a classic Anglo-Saxon Myth.

Trillium Exchange: #3

I have definitely decided I want to make a strap end based on one I found at the British Museum's Online Collection. The moment I saw the strap end I fell in love and thought it would make a very appropriate gift for a Anglo-Norman Lady, if I could make a decent replica or at least something close to the right size and shape. AS a backup plan I also cut out the wood for a small cedar reliquary box that I could carve a scene from either the life of Christ or a Saint, as was common in the day.

My initial efforts to recreate the strap end in wood failed. The original is only 4 cm long and has a lot of detail in it. While I was able to cut out the shape, I was unable to carve in the amount of detail required to make something I would be proud to gift to someone of Rylan's status. I have been told to ignore her status, but I can't help but feel the gift must live up to her and be something she would proudly display every day.

Earlier this year we bought some bronze grains and some pewter grains, with the intention of making a soap stone mold and learning the art of metal casting. The same problem arose with the soapstone mold making as it did with the wood. I was not able to carve the required detail into such a small surface area. Creating the carving in reverse also is far more difficult that I expected.

Now that I have decided I must at least attempt casting a strap end I moved on to Plan B - Sand Casting. I dug out my old, stale, Sculpey and went to work creating a 3D model of the piece. Even using something as easy to use as Sculpey, this turned out to be far harder than expected. I know 3 cm is just over an inch long but apparently my fingers can not, or will not, work with something that small regardless of the medium. On to Plan B.a - Create a mold that looks reasonably decent and as small as possible, which turns out is about 7 cm. It isn't an exact replica but I would call it a very good "inspired by" piece.

Now I just have to mix some fine sand with some molasses, as recommended by the Spouse who has read up on sand casting. Something about it making the sand hold the details better and the heat from the bronze will heat up the sugar and form a film that will make the finished piece release more readily.

Unlike the sand casting methods that the Spouse has investigated before, I plan to press my Sculpey model into a layer of sand and pour the bronze into it. The back of the model, and the inspiration, have flat backs so there is no need to do a 3D casting. I may move on to a 3D casting if my idea doesn't work. The great thing about my mold is it is reusable and so will afford many attempts.

Should the sand casting fail all the way around I will move on to lost wax casting. I hope I can make a wax mold as easily as I did the plasticine one. I also hope I can make the wax mold smaller, at least a little closer to the original's size, while maintaining the level of detail I want.


Wednesday, 25 September 2013

Trillium Exchange #2 : Sept 2013 - Feb 2014

So I decided to make a wooden replica of a bronze strap en I saw in the British Museum's Online Collection. Of course I had to choose the most complicated piece but I thought it was 3 or 4 inches long. When I first looked at the strap end I did not notice that it is only 4 cm long. Further research shows that most of the strap ends in this collection are between 4 and 6 cm long.

Not to be deterred I cut out a piece of birch, drew out the pattern, and started carving. I chose birch because it is a very dense wood that will simulate the weight of cast metal and will most likely hold up to the riveting process better than a more easily carved wood like basswood. I gave up after an hour. My smallest tools are just to big to recreate the detail found in the photo. That is when I went looking at other strap ends and found they were all very small, and many had a great deal of detail.

I spent several hours looking at other strap ends today. I found a couple that look like they would be easier to carve from wood. But, now I am wondering if I should carve it in beeswax and use that to make a lost wax casting in bronze or pewter. The simpler pattern could easily be carved in wood but would a wooden strap end be as impressive as a cast bronze one. Of course, with the easier shapes I could use the wood one as a mold and do a sand casting. Most of the straps had very flat backs which is what you would get from sand casting.

I'm glad I have 4 months to work on this. It is going to take me that long to get anything accomplished.

Saturday, 21 September 2013

Trillium Exchange #1: Sept 2013 -Feb 2014

I signed up for the Trillium Exchange, a hand made gift exchange between people in the Kingdom of Ealdormere. The person I drew has been in the SCA for quite a long time and has many high level awards to their name. Needless to say I am intimidated by the prospect of making something for this person. We are limited to $25 and that must include delivery, but if it is something we already own it doesn't count towards the limit.

We have been asked to keep notes, which I wanted to do anyway, but to not publish any details until after our gift has been delivered to its intended recipient. This will make it hard to keep as a blog but I will make my posts and simply save them as drafts. After my recipient has received their gift I will publish all the draft posts at the same time.

I have several ideas for what to make. I have gotten some really good ideas and feedback from Cate Townsend, who is not in this exchange. She was able to find some stuff in the British Museum that would be very interesting to make and would really push my skills to another level. While trying to match her searches phrases I came across a couple of nice Bronze pieces that look cool.

While I have not decided on a project yet, I do have several ideas that I am bouncing around.
  • A Wooden replica of a bronze strap end.
  • A carved wooden box.
  • A carved bone grooming kit - ear scoop, tweezers, comb, etc.
  • A bronze brooch.
  • A Bronze replica of the bronze strap end above.
Each of these would be a challenge for me and hopefully something gobsmackingly awesome for my recipient.